Luminosity Masks for Better Skies and Shadows
If your sky blows out when you lift shadows, or your shadow recovery muddies the highlights, luminosity masks are the cleaner fix. They let you target bright, dark, and midtone areas by actual brightness values, so your adjustments blend into the photo instead of looking cut out.

A high-contrast scene like this is where Configurator Reloaded 2 can speed up luminosity mask setup, while still letting you target sky, water, and shadow detail precisely.
When Luminosity Masks Help Most
Luminosity masks are useful whenever a normal selection feels too blunt. Instead of drawing around an area by shape, you select by brightness. That makes them especially effective for landscapes, architectural scenes, and portraits where highlights, shadows, and transitions need to stay natural.
They are also better than broad global edits when only one tonal range needs attention. If the highlights are too hot but the midtones already look right, a luminosity mask lets you work only where the problem lives.
How Luminosity Masks Work in Photoshop
Luminosity masks live in the Channels panel as grayscale channels. White areas are selected strongly, black areas are not selected, and gray areas fall somewhere in between.
To use one, hold Cmd on Mac or Ctrl on Windows and click the channel thumbnail. Photoshop loads that brightness map as a soft selection, which is why Curves, Levels, and other tonal adjustments blend much more naturally than a hard-edged mask.
How to Build and Use Them Manually
You can create a simple set of luminosity masks without extra tools:
- Open the Channels panel and
Cmd/Ctrl-click the RGB composite channel to load luminosity as a selection. - Save that selection as a new channel for highlights.
- Invert or refine the selection for shadows.
- Use calculations, intersections, or subtraction if you want narrower highlight or shadow ranges.
- Load a channel as a selection, then create a Curves or Levels adjustment layer so the selection becomes the layer mask automatically.
This works, but it is easy to lose track of which channels you already built. Manual mask creation makes sense for learning, yet it is slow when you need the same setup on many files.
Generate the Full Set Faster With a Workflow Script
Configurator Reloaded 2 includes a built-in Luminosity Masks script that creates multiple channels for highlights, midtones, and shadows in one go. Once the channels exist, you can load any of them as a selection with Cmd/Ctrl-click, apply your adjustment, and keep moving.
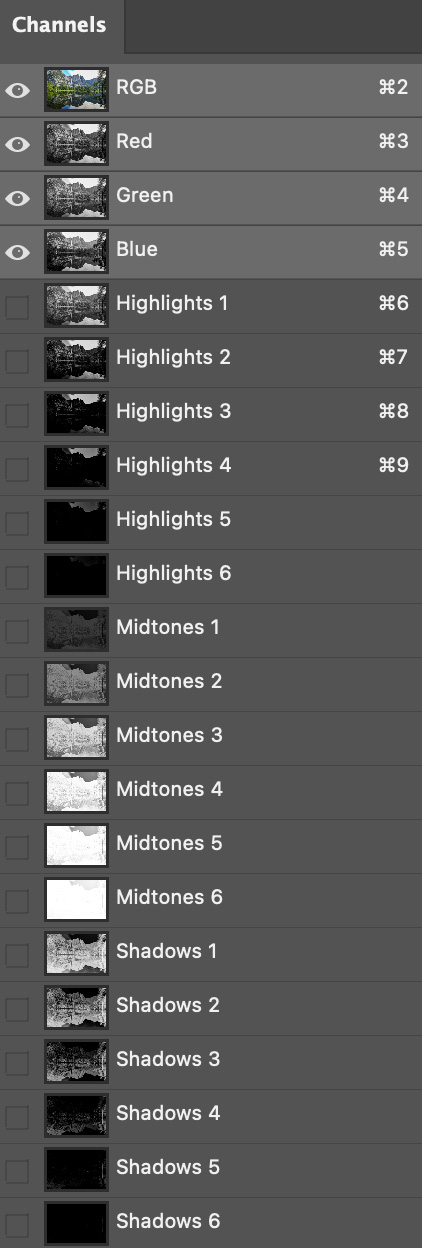
The Luminosity Masks workflow script in the plugin builds the channels for you, and the matching delete script clears them again when you want a cleaner Channels panel.
Start with the tonal range that is causing the visible problem, then use adjustment layers so everything stays reversible. If you want faster mask setup without giving up precise control, try Configurator Reloaded 2 and add the luminosity tools to your panel.