How to Brighten Eyes in Photoshop Naturally
If you want to know how to brighten eyes in Photoshop without that obvious fake glow, the fix is usually restraint and order, not a stronger filter. Eyes need a small lift in the iris and catchlights, not a blanket brighten across the whole face.
Eye brightening is a short chain of steps, not one filter: fix exposure, lift the iris with Curves, add catchlights with dodge, sharpen last. Each step is simple on its own. The slowdown on portrait after portrait is jumping between menus and rebuilding the same layer setups, not deciding what to do next.

Photo by Alexandru Zdrobău on Unsplash.
Fix Exposure Before You Touch the Eyes
Brightening eyes on a photo that is still too dark overall almost always backfires. Lift exposure, white balance, and contrast first with Camera Raw or a Curves adjustment on the whole image. Once the face reads correctly, you can see what the eyes actually need.
If the whites of the eyes look yellow or dull, a selective Hue/Saturation pass on the sclera can help. Add an adjustment layer, narrow the color range to yellows, and lower saturation slightly. Keep the change small. You are cleaning up color, not painting new whites.
Brighten the Iris With a Curves Layer
The cleanest way to brighten eyes in Photoshop is a Curves adjustment layer masked to the iris only.
- Add a Curves adjustment layer above your retouching stack.
- Click the midpoint of the curve and drag it up slightly. A small lift is enough.
- Invert the layer mask with
Cmd+I(Mac) orCtrl+I(Windows) so the effect is hidden. - Paint with a soft white brush on the mask, staying inside the iris and avoiding the sclera edge.
- Lower the layer opacity until the eyes look clearer, not glowing.
If one eye is darker because of shadow, mask more on that side. Symmetry in the mask matters less than symmetry in how the eyes feel on the face.
Add Depth With Dodge on a Gray Layer
Curves lifts overall brightness in the iris. Dodge adds shape to catchlights and subtle highlights around the pupil and lid line.
The standard setup:
- Create a new layer and fill it with 50% gray (
Edit > Fill > 50% Gray). - Set the blend mode to
Soft Light. - Paint with a soft white brush at 3 to 8% flow on the brightest parts of the iris and existing catchlights.
- Optionally paint very lightly along the lower lid to open the eye without whitening the sclera.
Soft Light builds up gradually, which is why it works well for eye work. Overlay is stronger and easier to overdo on small areas like eyes.
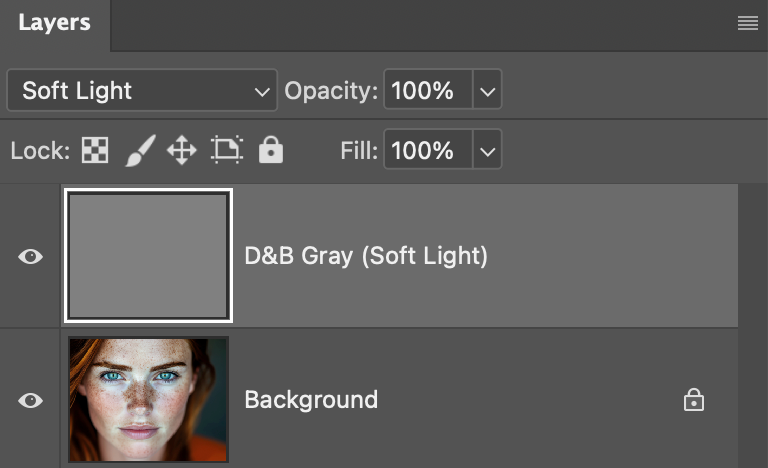
A 50% gray Soft Light layer is the standard starting point for dodge work on eyes and catchlights.
Sharpen Eyes Last and Mask the Effect
Sharpening belongs at the end of your eye workflow, after brightness and dodge are done. Otherwise you sharpen a version of the eyes that still needs color or tone fixes, and the result looks crunchy.
Use Smart Sharpen or High Pass on a merged copy, then mask the effect into the iris, lashes, and brow hairs only. Keep radius low and amount moderate. Eyes should look crisp, not outlined.
Zoom out after every pass. At 200% magnification it is easy to think the eyes need more brightness when they already read clearly at print size.
How to Keep Eye Brightening Natural
Most unnatural eye edits share the same mistakes. Avoid these and your results will look closer to great studio light, not a filter:
- Do not brighten the entire eye socket. Stay inside the iris and existing catchlights.
- Keep sclera changes separate from iris changes. Different masks, different strength.
- Match both eyes to the same light source. If one catchlight is stronger because of how the subject was lit, follow that pattern instead of forcing symmetry.
- Stop when the eyes draw attention appropriately. They should lead the viewer in, not dominate the face.
- Check skin tone around the eyes. Aggressive brightening can leave a faint halo on the surrounding skin if the mask is too soft or too wide.
If you repeat these steps on every portrait, the tools add up fast: Curves, layer masks, dodge layers, sharpening. That is a navigation problem more than a skill problem. You already know what each step does. The time goes into finding the same menu paths again and again.
Put Your Eye Tools in One Ordered Panel
Configurator Reloaded 2 lets you drag the commands you use for eye work, Curves, invert mask, fill gray, Soft Light, and Smart Sharpen, into one custom panel arranged top to bottom in editing order. Use Command Search to find a command once and pin it, switch workspaces when you move from retouching to export, and keep building the layout as your portrait workflow evolves. If menu diving eats into your sessions, try the plugin free and put your eye brightening steps in sequence so the next step is always one click away instead of a menu hunt.