Dodge and Burn in Photoshop for Natural Depth
If your portraits still look flat after cleanup, dodge and burn in Photoshop is often the missing step. It lets you brighten and deepen small areas selectively, so faces keep their texture but gain more shape, contrast, and depth.

A portrait like this is a strong subject for dodge and burn practice in Configurator Reloaded 2.
Photo by Erik Lucatero on Unsplash.
When Dodge and Burn Actually Helps
Dodge and burn is most useful when the image is already clean, but still feels a little lifeless. Skin may be even, yet the face lacks dimension. Highlights may be there, but they do not guide the eye where you want it. Shadows may exist, but they are not helping the structure of the subject.
That is where this technique works well. You dodge small highlights to lift them gently, and burn small shadows to create shape. Done well, it does not look like an effect. It just makes the portrait feel more polished and intentional.
How to Set Up Gray Layer Dodge and Burn
The simplest setup is a 50% gray layer in Soft Light or Overlay mode. Soft Light is the safer starting point because it builds up more gradually. Overlay is stronger and easier to overdo.
Use this setup:
- Create a new empty layer above the image or retouching group.
- Fill it with 50% gray using
Edit > Fill > 50% Gray. - Set the layer blend mode to
Soft Lightfor subtle work, orOverlayfor a stronger effect. - Paint with a soft white brush to dodge and a soft black brush to burn.
- Keep brush flow low, usually around 3 to 10%, so you can build the result slowly.
If you repeat this often, tools like Configurator Reloaded 2 can save time. Its built-in D&B Gray scripts create the layer automatically, so you can start painting instead of rebuilding the setup every time.
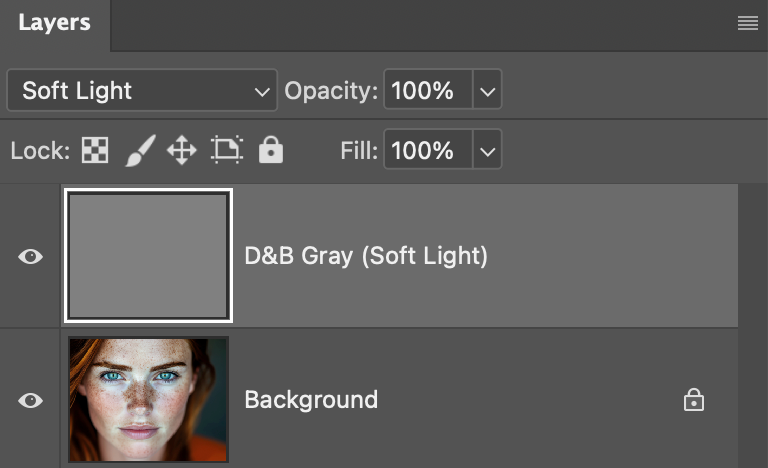
The D&B Gray script in the plugin creates a ready-to-paint gray layer for non-destructive dodge and burn in Photoshop.
When Curves Is Better Than a Gray Layer
Gray layers are great for fast, intuitive retouching. Curves-based dodge and burn is better when you want more control over how much brightening or darkening you are applying.
To build it manually:
- Add one Curves adjustment layer for dodging and raise the curve.
- Add a second Curves adjustment layer for burning and lower the curve.
- Invert both masks so they start black.
- Paint with white on each mask only where you want the effect to appear.
This method takes a little longer to set up, but it is flexible. If the dodge is too strong, lower the curve. If the burn is too weak, deepen it. You are not locked into the brush strength alone. If you want that setup faster, the built-in D&B Curves script creates both layers and masks in one step.
How to Keep Dodge and Burn Natural
Most bad dodge and burn is not a setup problem. It is a pacing problem. The effect gets pushed too far, too fast. These habits help:
- Work zoomed in for detail, but zoom out often to judge the whole face.
- Build up with many light strokes instead of one strong pass.
- Follow existing light patterns instead of inventing new ones.
- Focus on transitions, not only on bright spots and dark spots.
- Stop when the image looks clearer, not when every contour is obvious.
A tablet helps, but it is not required. What matters more is patience and low flow. If the retouch starts to look sculpted or plastic, pull it back.
Where Dodge and Burn Fits in Your Workflow
Dodge and burn usually works best after cleanup and before final sharpening. Remove distractions first, fix uneven tone if needed, then shape light. If you also use frequency separation, handle color and tone issues there first, then use dodge and burn to refine depth and attention.
For portraits, common targets are under-eye shadows, cheekbones, jawlines, catchlights, and hair transitions. For product or beauty work, it is also useful for edge definition and subtle contrast control. The technique is versatile because it stays non-destructive when you work on separate layers or masks.
Conclusion
Dodge and burn in Photoshop works best when you treat it as subtle light shaping, not dramatic contouring. Start with a gray layer if you want speed, switch to Curves if you want more control, and keep the effect gentle enough that the viewer notices the result, not the retouching.
If you want to skip the repetitive setup, Configurator Reloaded includes built-in dodge and burn workflow scripts that you can add to a custom panel and launch with one click. You can try it free.