How to Automate Your Photoshop Workflow
Photoshop automation is about doing more with fewer clicks. Instead of performing the same steps manually every time, you set things up once and let the software handle the repetition. Whether you are resizing dozens of images, setting up frequency separation on every retouch, or applying the same sharpening preset, automation frees you to focus on creative decisions instead of routine setup.
This guide covers the main ways to automate your Photoshop workflow: actions for repeatable steps, scripts for complex techniques, batch processing for multiple files, and custom panels that bring everything together.
Use Actions for Repeatable Steps
Actions are Photoshop's built-in way to record and replay a sequence of steps. Open the Actions panel, click Record, perform your workflow, then Stop. From then on, you can run the same workflow with one click. Actions work best for tasks that follow the same pattern every time: resizing for web, applying a sharpening preset, converting to sRGB, or adding a watermark. Assign shortcuts to your most-used actions or add them to a custom panel for instant access. The key is to identify routines you repeat often and turn them into actions first.
Automate Complex Techniques with Scripts
Some techniques require several manual steps before you can even start editing. Frequency separation needs high and low frequency layers. Luminosity masks need multiple channels for highlights, midtones, and shadows. High-pass sharpening needs a merged layer, desaturation, High Pass filter, and blend mode change. Doing this by hand every time is tedious and error-prone. Scripts automate these setups. A single click creates the correct layer structure, blend modes, and masks. Plugins like Configurator Reloaded 2 include built-in workflow scripts for frequency separation, luminosity masks, dodge and burn, and high-pass sharpening. You add the script to your panel and trigger it with one click.
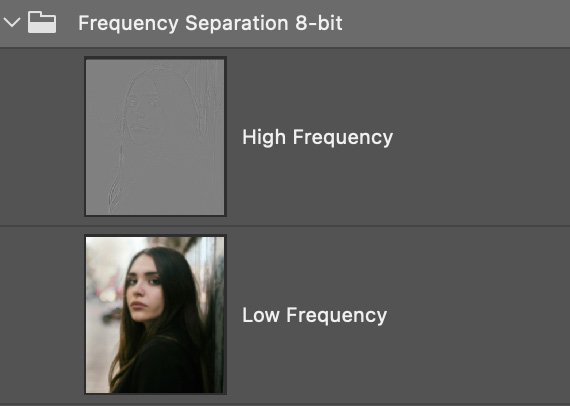
Frequency separation layers in Configurator Reloaded 2, set up automatically with one click.
Run Batch Processing for Multiple Files
When you need to apply the same edit to many images, batch processing saves hours. Use File > Automate > Batch, select your action, choose a source folder (and optionally a destination), and run it. Photoshop processes every image in the folder. This is ideal for export workflows: resizing to a fixed dimension, converting to JPEG, applying a watermark, or running a sharpening preset. Combine batch with actions for the most efficient workflow. Record the steps once, run them on hundreds of files without opening each image manually.
Put Your Automation in One Place
Actions and scripts only help if you can find them quickly. Default Photoshop panels spread tools across menus and nested options. A custom panel puts your automation in one place: actions, workflow scripts, and tools side by side. Instead of digging through panels, you get one-click access. Group related items in containers, use color-coding, and create separate workspaces for different tasks, for example retouching versus export. The plugin lets you build custom panels with drag-and-drop, no coding required. You add workflow scripts, actions, and tools to the panel, and run them with a single click.
Custom panels in the plugin put your automation within one click. Try it free.
Start Small and Scale
You do not need to automate everything at once. Start with one or two actions you use daily. Add a workflow script for a technique you set up often. Build a simple custom panel with those items and use it for a week. Notice which steps still feel manual and add those next. Over time, your panel grows into a workflow that matches how you work. Automation pays off when it removes the steps you repeat most often.
If you want to try this approach, Configurator Reloaded offers a free trial. You can add workflow scripts, actions, and tools to custom panels with drag-and-drop and see how much you can automate in your Photoshop workflow.